
Part 2: Shortcuts for Smooth Presentations
In the previous post in this series, I discussed three key design principles.
Today, I want to consider the actual moment of delivery. You’re in a classroom or conference venue; you have a PowerPoint slideshow ready to go; you’re hoping not to fumble around like a fool in front of your audience. What can help?
For simplicity’s sake, I’m going to assume you’re using a recent edition of PowerPoint on a Windows PC, since that’s the most common scenario for presenters in American classrooms. The following technical tips can make your PowerPoint delivery much smoother. Perhaps you know all these tips already, but unless you’re fairly experienced, there’s a good chance something in this post will be new to you.
Visual Consistency
At some point, every PowerPoint user has prepared a beautiful set of slides on one computer, only to discover that they don’t display correctly on a different computer—say, the one in the classroom. What went wrong?
1. Embedded Fonts
When you put text on a PowerPoint slide, your computer displays it using one of the fonts (technically typefaces) that the computer already has available. Think of each font you use as a separate little software package—it lives somewhere else in your computer, not inside the PowerPoint program. When you write a piece of text in (for example) Goudy Old Style, your PowerPoint program has to invite in the Goudy Old Style font to display it, as if it were getting an actor to come read aloud a story you’d written.
Some fonts are widely available on different computers because they’re in standard font packages. Every new Windows computer since (I think) 1992 has included a copy of Times New Roman, for example. But others are less common. If you choose one of these less common fonts for your text, you’re running a risk that your classroom computer won’t have that font available. In that case, your text will be displayed using a different font. It may look ugly; it may be less readable; it may completely break your slide design.
But don’t despair! If you aren’t sure whether your classroom computer has the font you want to use, you can use it anyway if you take the precaution of “embedding” your fonts.
To embed your fonts in PowerPoint, just open the menu of options for saving your file: File > Options > Save. Find the box marked “Embed fonts in the file” and make sure it’s checked, then click OK. That’s it! When that box is checked before you save your file, the fonts you use in the slideshow will be available no matter what computer you use to display the presentation.
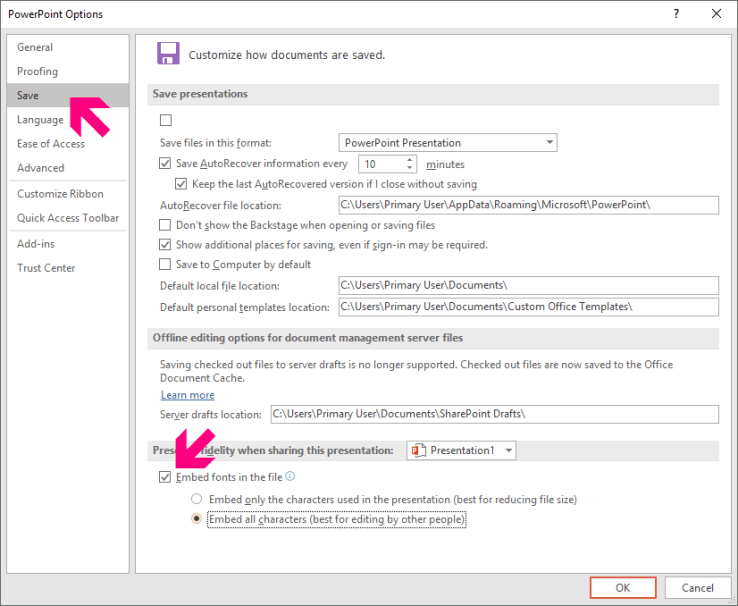 (If you want to be able to edit your file on different computers, be sure to check the sub-option to “embed all characters” so that all the letters and symbols in the font will be available if you need them.)
Note that embedding your fonts increases the total file size significantly. You should first make sure your classroom computer can handle the larger file.
2. Slide Size
Another common problem for presenters: Your classroom computer and projector may use a different aspect ratio from the settings on your home computer.
Basically, when you made your slides at home, you made them either squarish (“standard,” 4:3) or more rectangular (“widescreen,” 16:9). If your classroom computer has the opposite setting, your slideshow will look small because it doesn’t use the entire screen in the classroom. There will be bars of blank space on the projector screen, either above your slides or beside them. That’s usually not a catastrophe, but it represents wasted space, and it sometimes means your audience will struggle to see smaller details on your slides.
To avoid this problem, find out in advance what aspect ratio your classroom computer and projector screen have. Then, before you make your slides, adjust your settings accordingly: Design > Slide Size.
Seamlessness
At some point, every PowerPoint user has stood in front of a room of people for what seemed like an eternity, fumbling with a mouse (or worse, a tiny trackpad) instead of delivering the talk she came to give. The audience watches, glassy-eyed, as the little cursor slowly moves across the screen to click a button, then slowly back to click another, and so forth. It’s embarrassing, it’s distracting, and it’s a rite of passage for inexperienced public speakers. However, memorizing a few keyboard shortcuts can all but eliminate this problem from your life.
If you’ve used PowerPoint at all, you probably know how to use the arrow keys (← ↑ ↓ →) to advance to the next slide (or move back to the previous one) in your slideshow, and you probably know the Escape key will let you exit a presentation. But the keyboard can do a lot more for you than that. Here are the five tips I’ve found most helpful for displaying PowerPoint presentations on a PC.
1. F5 to Start the Presentation
This is the very first shortcut I learned. Trying to begin a PowerPoint presentation during my first year in college, I was struggling desperately to move the cursor across the screen using the track point on a remote control. “Eff five!” half the class shouted at me. They were right. To start a slideshow, just press the F5 key and your presentation will start at the beginning. It’s that simple.
(If you want to start the slideshow at the specific slide you have open instead of Slide 1, press Shift and F5 at the same time. Or you could use the next tip.)
2. [Number]+Enter to Go to a Specific Slide
Let’s suppose you’re moving through a slideshow, and you’re on Slide 27, and suddenly you need to refer to something that was all the way back on Slide 12. You could flip back through all the slides in between (or, worse, exit slideshow mode and select Slide 12 with the mouse). But you definitely don’t want to do that. There’s a better way.
Stay in slideshow mode. Just use the number keys on the keyboard to type 12 and then hit Enter. You’ll jump directly to Slide 12.
When I’m presenting, I try to make sure all the slides are numbered in my notes, just for this purpose. This has been useful more times than I could describe. But don’t worry if you haven’t done that—there is another option.
3. Ctrl+S to Show List of Slides
What if I want to jump to a specific slide, but I don’t know its number? Pressing the Control key and the letter S at the same time will open a dialog box that shows a list of all the slides. I can select the one I want without stopping the presentation.
4. Alt+Tab to Switch Between Windows
Suppose you’re planning to show a quick video clip from a website in the middle of your lesson. You wisely set up the clip in a web browser before class. It’s just sitting there in the background, paused, until you need it.
The moment arrives. To switch quickly from your PowerPoint slideshow to the browser with the video, hold down the Alt key and press Tab once. You’ll see a set of thumbnails or icons for all the windows you have open. To jump to the window you want, keep holding down the Alt key, and press Tab repeatedly until the window you want is highlighted. Release the Alt key, and you’ll jump there directly.
This shortcut will save enormous time in a multimedia classroom, and it will make presentations seem far more polished. (It isn’t just a PowerPoint shortcut; Alt+Tab works for switching among any windows you happen to have open on a PC.)
And finally ….
5. B or W for a Blank Screen
You probably want to shut off the slideshow sometimes. It’s good to focus attention away from the screen occasionally—to hold a class discussion, for example, or to offer unscripted thoughts about a serious topic.
You could plan this in advance by inserting blank slides into your presentation, or you could use a remote control that has a special button for it, or you could shut off the projector. But the easiest and most universal way is to use the keyboard.
Pressing the letter B during your slideshow will replace whatever slide you’re looking at with a blank black screen. Pressing W will give you a blank white screen. When it’s time to return to the slideshow, press any key to resume the presentation.
Conclusion
However simple or elaborate your PowerPoint slides may be, nothing matters more than your ability to display them well in front of an audience. By making your presentations more consistent and more fluid, the tips in this post should help you avoid unnecessary distractions and gain confidence as a speaker.
Next time, I’ll begin explaining how you can create custom PowerPoint templates to suit your particular teaching style—with an eye toward the elements that history teachers particularly need.

[…] next post in this series will be shorter and more concrete: In a few days, I plan to examine some simple ways […]
LikeLike
This was amazing, especially for the embed font tip. I get so mad when I’ve spent hours making my fonts look good (and, as a nerd, somewhat matching to the theme of the presentation). When they don’t transfer and immediately go to Arial, I am filled with such disappointment.
LikeLiked by 1 person